Cakes & Desserts & Liqueurs
Various projects at Royal HaskoningDHV
Projects

Polar Vertex

Drawing of the week book
How to turn hundreds of whiteboard drawings in a great looking book.

Modern lamp
How to build your own great looking lamp with wood and easy to get materials.

VouwGrond - Paper craft soil layer visualization
Soil types at almost any location in the Netherlands using paper craft!

MySensors based sensors + dashboards

Simple DIY wireless button
How to make a BIG wireless button to trigger anything on your computer, laptop or Rasberry Pi.

DIY dressoir using wood

Candle powered Christmas pyramid
Building a Christmas pyramid (Weihnachtspyramide) with wood.

Construction of a Gloggomobil

Homebuild windmills

DIY Tetrapod plush

Climagon climate paper craft

Internet hardware furniture
Old code
Various games / projects at Deltares

Pompeii - Bike pump controlled game

Om de put (Around the pit)

Levee Patroller

Groen Eiland

Zand verdeler

Horsegame

CPT - game

Port of the Future (Corealis)
Serious game about ports of the future; nature based solutions.

Virtual Reality versions of experimental facilities

CIrcle
CIrcle a tool to support the analysis of domino effects of critical infrastructures.

Sustainable Delta Game
Game which combines 3d graphics, playing cards and a simulation model.
Older games
Augmented Reality / Graphics

Subsoil on a mobile device
My Master thesis: Visualizing and estimating the distance and depth of underground infrastructure.

Real-time visualization of water simulation
Turning calculated water flows into a real-time visualization.

RED - Motion captured animation

Open Data Sources for 3D Data Visualisation
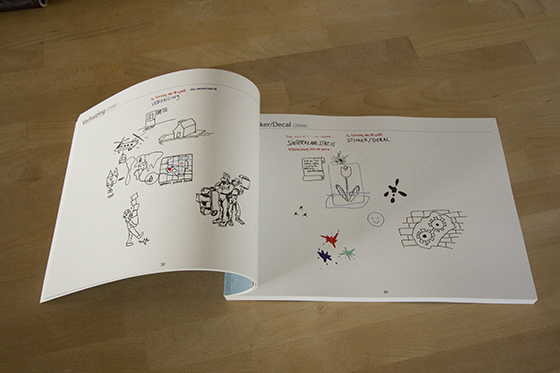
Drawing of the week book
The making of the "drawing of the week" book
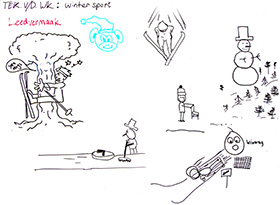
September 2007: We once decided to do a drawing on the whiteboard. We could never have imagined that it would be the start of the weekly 'drawing of the week'.
Seven years later the drawing of the week is still very much alive: Even after switching rooms and relocating twice to a different building. Every week after drawing a subject is taken of the whiteboard.
I decided it would be awesome to make a book out of all these drawings, roughly representing seven years of time. Turning whiteboard drawings into a book brings many issues: Objects on the whiteboard, reflections, difference in light and whitebalance, etc. This article will explain the final procedure and how a unique book was created. A book which counts 250 pages of the finest artist and programmer's art!
During this tutorial the same drawings will be used to illustrate the process. This tutorial hopefully helps you on your own great projects. It took quite a while to get things all work out in the end and this might save someone else such work  .
.
Step 1) Getting clean drawings
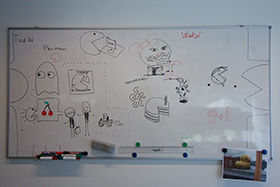
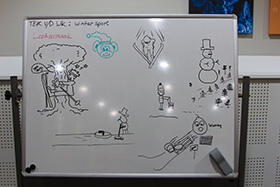
The first step was to convert the photos somehow to something usable, as all whiteboard photos are completely different, have reflections, etc. Such as these:
 |
 |
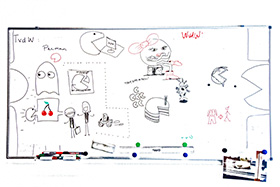
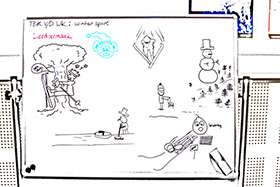
Thankfully there is the "Fred's Imagemagick Whiteboard script". This script magically turns whiteboard photos in something more usable, as you can see in the following row of images. Using MingW and ImageMagick and a simple batch script we get this result:
 |
 |
#!/bin/bash

# this script will go through all jpg files (case sensitive, so not JPG)
# and sheck if files exist already. if not, process it.
# Uses WhiteBoard script from Fred's ImageMagick site.


for file in /d/..../alldrawingfiles/*.jpg
do

if [ -e "/d/..../afterwhiteboard/${file##*/}" ]
then
 echo "ALREADY EXISTS /d/..../afterwhiteboard/${file##*/}"
else
 echo "Processing"
 echo "/d/..../afterwhiteboard/${file##*/}"
 whiteboard -e none -S 300 -f 128 -o 5 -t 60 "$file" "/d/..../afterwhiteboard/${file##*/}"
fi

 echo $file
done
Step 2) Removing all the nonsense
Now that we have "clean" photos, we need to remove the parts of the photos which are not so interesting. Basically, that means the frame of the whiteboard and everything outside of it. And also some of the pictures we put on the whiteboard, the wiper and magnets (unless the one or two times that those are relevant to the drawing).
To do this, all photos had to be post processed in Photoshop: By making a quick lasso selection around the important parts, taking out some elements which are not. Then, using an custom made action the selection would be filled with white. Then the selection would be inverted with black and saved automatically. This gives a mask image.
A mask image can be applied to images, telling what should be visible and what not. Effectively removing everything we are not interested in. For our pictures we use the following mask to remove all unneccessary elements:
 |
 |
Step 3) Applying the mask
Using another ImageMagick script (now under Windows and not MingW) we apply the mask to the image that had been "whiteboard script" fixed before. The photo is also trimmed such that only the important part is left, see example. The command to do is:
convert "D:\....\afterwhiteboard\20100624-IMG_9172.jpg" "D:\....\allmasks\20100624-IMG_9172 copy.png" -alpha Off -compose copy-opacity -composite -trim +repage D:\....\aftermask\20100624-IMG_9172.jpg.png
A list of ImageMagick convert operations was created using a custom PHP script which just looked for JPG files in a source directory, checked if there was a matching mask, and if so, wrote the line to a text file. Quite straightforward! . But here is the script anyway, so you get an idea how to loop through files. The script is kind of hackish, but perfect for this situation.
	$path = "D:\\....\\afterwhiteboard\\";
	$maskpath = "D:\\....\\allmasks\\";
	$dest = "D:\\....\\aftermask\\";
	$batchdest = "D:\\....\\maskfiles.bat";

	$dir = opendir ($path);

	$ar = array();

	while (false !== ($file = readdir($dir))) {
			if (strpos($file, '.jpg',1) )
			{
				$mask = str_replace(".jpg", " copy.png", $file);

				if (file_exists($maskpath . $mask) == true)
				{
					$ar[] = "convert  \"" .  $path . $file . "\" \"" . $maskpath . $mask . "\"  -alpha Off  -compose copy-opacity -composite -trim +repage " . $dest . $file . ".png\n";
				}
			}
	}

	foreach($ar as $k => $v)
	{
		echo $v ;
	}

	// Write file too.
	$s = implode($ar, "");

	file_put_contents($batchdest, $s);
Post mask, we get the following result. Clean drawings:
 |
 |
Step 4) Getting all the images in LaTeX
A comma separated file (CSV) is used to get the images in the book. This CSV also describes the "Word of the week" which we had as well, and the year the drawing was made. The book was then generated in LaTeX. Originally InDesign was used, but it seems to be impossible to fix a "data merge" which takes care of pages with an left/right page margin at the spine.
If you have never heard of LaTeX before, in short: it is a language which resembles a similar thought a HTML. You can build a document (book, report, posters, etc.) using a special language indicating what needs to happen. This is eventually compiled to pages of your book.
Example CSV
filename,title,word,date
D:/..../aftermask/20071210-IMG_8290.jpg,Neushoorn,,2007
D:/..../aftermask/20071217-IMG_8569.jpg,Inboorling,,2007
D:/..../aftermask/20071217-IMG_8570.jpg,Hoe teken ik een poppetje,Hangoudere,2007
D:/..../aftermask/20080111-IMG_9054.jpg,Sumo worstelaar,,2008
Reading the CSV in LaTeX
This very simple CSV is read in LaTeX using the following snippet of code:
\applyCSVfile{D:/..../csv/drawingbook.txt}
{
	\newpage
	\phantomsection
	\nopagebreak
	\begin{textblock*}{\textwidth}(0em,1.0cm)\mbox{}\hrule\end{textblock*}

	\addcontentsline{toc}{chapter}{\insertbyname{title}}

	% Add absolute positioned line under each title
	\nopagebreak\Huge\textsf{\insertbyname{title}} \LARGE \textcolor{subgrey}{ (\textsf{\insertbyname{date}})}

	\nopagebreak
	\begin{center}
	\nopagebreak
	% include graphics unles skip graphics has been defined (for example for toc making)
	\ifx\skipgraphics\undefined
	\includegraphics[height=\measurepage,width=\textwidth,keepaspectratio]{{\insertfilename}.png}
	\else
	\fi
	\end{center}

	\newpage
}
A lot is happening here, the core of the book!
First, we read the CSV file 'drawingbook.txt' using \applyCSVFile, and loop through it (between the { and }). A new page is started for every row, a table of contents item is added using \addcontentsline, a title is placed on the page using the title column of the CSV (\insertbyname{title}) and the image is included using \includegraphics while keeping the aspectratio correct.
Do note that the images have two extensions because of my scripts, so the actually file being search for is filename.jpg.png (filename.jpg coming from the filename column in the CSV).
Table of contents
The loop needs to be run twice, to build the table of contents. So I run the LaTeX script once with the \includegraphics disabled (by setting \def\skipgraphics{1} earlier). using a define check. This makes the TOC be generated in a second. The second pass, the define is commented and all images are actually added to the book (quite slow for 250+ images at high resolution). This way your table of contants and images work out just fine.
Step 5) Making the cover
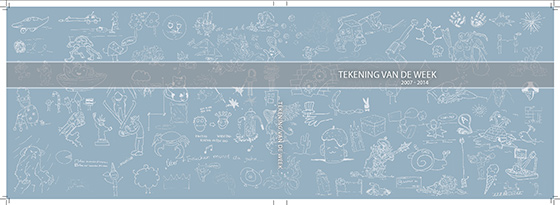
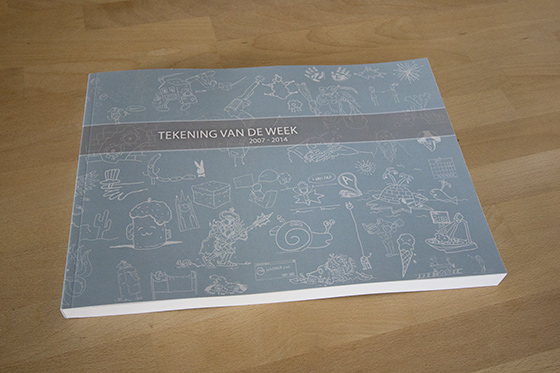
The cover was made using actual images from the book. They were simply taken from the post processed photos (after whiteboard script) and used inverted as a mask on a blue background, creating the illusion of a cover of many drawings. The cover was put together in Adobe InDesign because the cover measurements need to be very accurate to be placed correctly.
The printing company supplied an calculation tool for the proper document settings (margin, bleeding, etc) in order to make sure that it would match for the paper weight (135 gr.)
 |
 |
 |
There were some transparancy issues with the PNG's. Somehow they did not have alpha... but yet they did. This was solved by using another PHP script to make a batch with ImageMagick convert.exe actions.
convert "D:\....\afterwhiteboard\20071210-IMG_8290.jpg" "D:\....\cover\masks\20071210-IMG_8290 copy.png" -despeckle -alpha Off -compose copy-opacity -composite -trim +repage -grayscale rec601luma -alpha remove -negate D:\....\cover-final\20071210-IMG_8290.jpg.png
Taking many of these images and putting them together results in the cover (including crop marks). This is the exact cover that was printed, as you can see below.
Post LaTeX actions
We are not completely done after LaTex has generated a big 650MB PDF. Depending on your printing company, you might have to convert the PDF to a right compatibility format (eg PDF/X1a). This is something I did in Adobe Reader's "Preflight" settings.
LaTeX should be able to do it as well, but after trying to solve some strange conflicts enabling the PDF library, going for Adobe Reader seemed like the easy solution. Although it would have been great to get everything done with just one script .
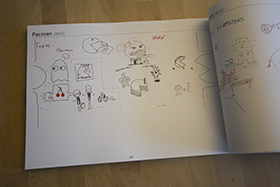
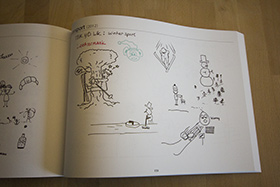
The final result
We have printed the book at deboekdrukker.nl with the size of A4 21x29,7cm (h x w), 135 grams paper and paperback. A total of 250 pages with amazing drawings, covering seven years of creative and wacky ideas . Hopefully this article can also help you get started with automatic book generation!
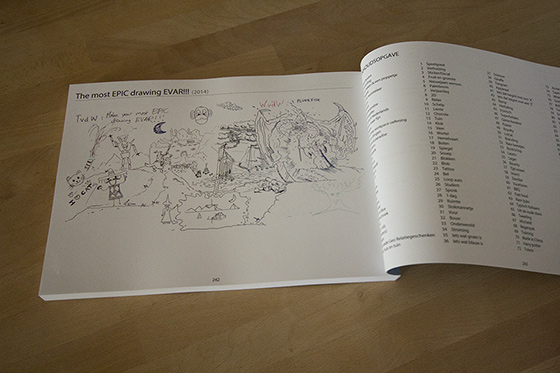
The two drawings we have followed from the start...
 |
 |
Cover
Inside
The last 'most epic drawing' in the book
Volume II
We are still making drawings every week. 20 new ones and still counting! So if we keep going at this rate, we will have a new book in a couple of years again.