Cakes & Desserts & Liqueurs
Various projects at Royal HaskoningDHV
Projects

Polar Vertex

Drawing of the week book
How to turn hundreds of whiteboard drawings in a great looking book.

Modern lamp
How to build your own great looking lamp with wood and easy to get materials.

VouwGrond - Paper craft soil layer visualization
Soil types at almost any location in the Netherlands using paper craft!

MySensors based sensors + dashboards

Simple DIY wireless button
How to make a BIG wireless button to trigger anything on your computer, laptop or Rasberry Pi.

DIY dressoir using wood

Candle powered Christmas pyramid
Building a Christmas pyramid (Weihnachtspyramide) with wood.

Construction of a Gloggomobil

Homebuild windmills

DIY Tetrapod plush

Climagon climate paper craft

Internet hardware furniture
Old code
Various games / projects at Deltares

Pompeii - Bike pump controlled game

Om de put (Around the pit)

Levee Patroller

Groen Eiland

Zand verdeler

Horsegame

CPT - game

Port of the Future (Corealis)
Serious game about ports of the future; nature based solutions.

Virtual Reality versions of experimental facilities

CIrcle
CIrcle a tool to support the analysis of domino effects of critical infrastructures.

Sustainable Delta Game
Game which combines 3d graphics, playing cards and a simulation model.
Older games
Augmented Reality / Graphics

Subsoil on a mobile device
My Master thesis: Visualizing and estimating the distance and depth of underground infrastructure.

Real-time visualization of water simulation
Turning calculated water flows into a real-time visualization.

RED - Motion captured animation

Open Data Sources for 3D Data Visualisation
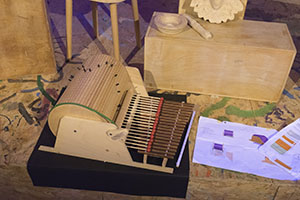
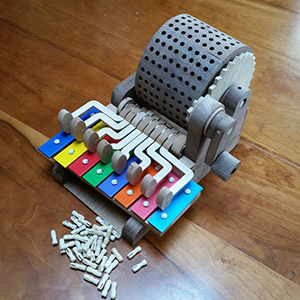
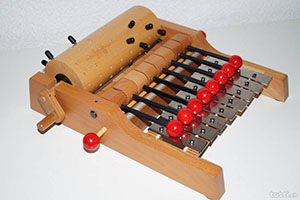
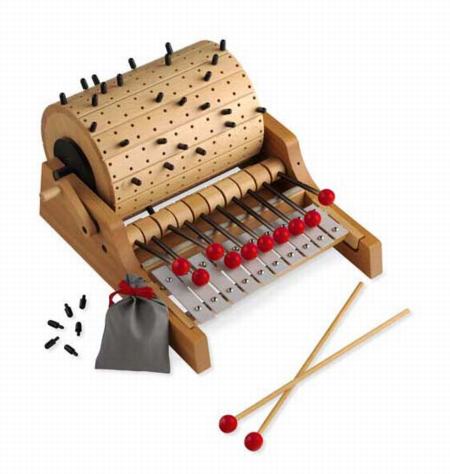
Building a Gloggomobil
The construction of the Gloggomobil (barrel organ Xylophone)
 And some video (be careful with sound volume, there was more going on than just the Gloggomobil during the demo evening!
  ):
):
This project was quite a tricky one as one can quickly hear errors in sound. However, I think the result is actually quite good. during the construction of the gloggomobil I have learned a lot- however, I would recommend to keep it quite a bit simpler for anyone that is considering to build one. This one takes time. Although I made a design for the project and calculated a lot, some things where decided on the spot - this page will not show all the details as it would really take a lot of time to write down.
Please note that a lot of photos are taken with a smartphone, and therefore are not really the sharpest :(
So, inspired by Wintergatan's Marble machine and some things I came across on the internet, I decided I would give the building of a Gloggomobil a try. But I did want it to meet the following criteria:
- Play 64 notes (8x8)
- Atleast one octave - including half notes
- Configurable
In the end this meant that we would up with a rather big machine!
You can use the Google sheet I made for calculations. It might help you with length of the pipes (and how much to get of it!), diameter calculation of the drum, how much wood is needed for your bars, etc. Also contains some stuff from my own calculations, but just ignore that.

Inspirational sources
Here are a couple of images I gathered on the web for inspiration. The Woodmakers magazine Youtube video is one of the key techniques I used to build the actual drum. Unfortunately I do not have the source URLs anymore, I gathered these images in 2016-2017.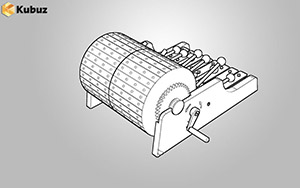


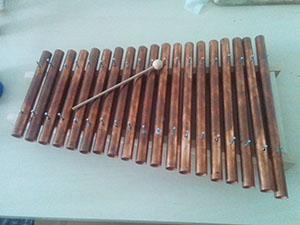
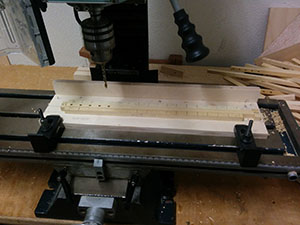
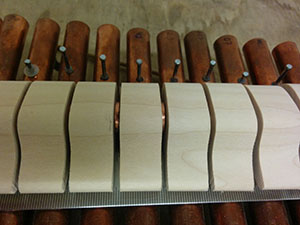
First step: "The Xylophone"
To get some sound out of the Gloggomobil we need to build a Xylophone, or technically a ferrophone, as in our case we are using copper pipes which you can find in any DIY shop (xylo means wood in Latin). These pipes need to be cut into pieces (get a pipe cutter, it will make it a lot easier!) of the right length to generate the right tone. These calculations work well in a Excel or Google Docs sheet. you will have to find the speed of sound of the material, and the note (key) you want to use as a base. Then it's just a matter of entering the right frequencies in a list and you get the right length.
Of course you will have to think about the amount of notes you want to play, and which notes before you get started. This will directly influence the width of your Gloggomobil too!
 [image of pipes being cut]
Calibrating the notes
Calibrating the notes can be done with any kind of frequency analyzer, but in my case I made use of multiple Android apps that would either tell me the note or the frequency (as I knew what it had to be). I could then carefully sand off bits of copper to reach the right frequency. note that I am sure that temperature and oxidation of the pipes influence the sound in the end. Unlikely that we will use the Gloggomobil in a professional setting, so not that much of an issue I suppose.
Wrapping up the Xylophone
You can now put the pipes together on a typical "xylophone" frame (two bars that become wider as pipe length increases). Note that the pipes have to rest on something flexible, otherwise there will be no vibration, and therefore, no sound. I ordered tiny silicon washer rings from AliExpress. These rings will also go on top of the nail such that the pipes are a little bit more fixed to the base.
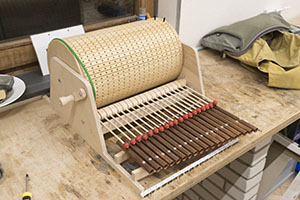
Building the Gloggomobil
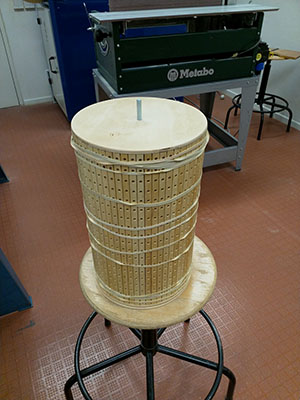
Now that we have the xylophone ready, it is time to build the Gloggomobil. I used a mix of wood types for this:- Multiplex for larger parts, such as the sides of the instrument and circles of the drum. The latter was not fun at all to create on the lathe, I would strongly advice you to do it differently if you have the tools available.
- Esdoorn? Maple tree?
- Ramin wood for the horizontal bars of the drum
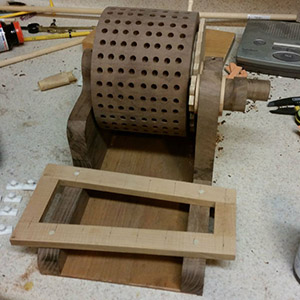
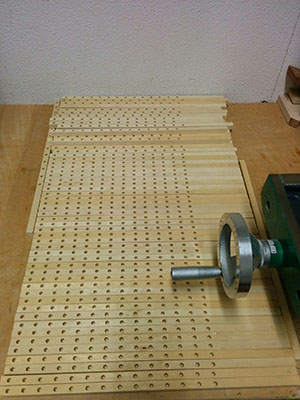
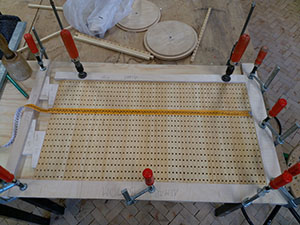
Creation of the drum
The basic idea of building the drum comes from a video which is from Woodworkers journal, seen in the video below. However I wanted the Gloggomobil to be fully configurable so this would require a lot of holes to be drilled.
First I prepared the "bars" of wood for the drum. I had these sliced and cut in a wood workshop, as it would have been impossible for me to make everything the same size. The pieces where cut to be square (1cm x 1cm) and
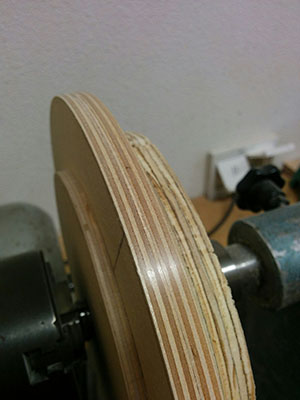
Then to make the sides. I had to use the lathe for these. I love the lathe (and would like to have one myself some day instead of at the university) but multiplex on a lathe is truly horrible. So it took quite some time and fine dust to get these circles ready. On one side of the drum you will have to connect the drive-belt, so make sure you have some kind of groove! I turned a smaller disk and sandwiched it between two larger ones. The other side is made out of a single piece of wood.
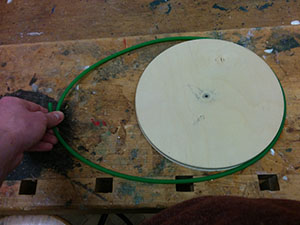
Then to glue everthing together I used the same technique as mentioned in the video above:
- Put all the wood pieces firmly together using a frame and wedges
- Put the wood glue over it and spread around
- Put the textile over it and press firmly
- Iron it a little bit to make the glue dry faster
- Now, after a moment, put it around the discs and keep it together with rubber bands
This was the most stressful part of the project I think - and no photos avaialble as things had to go a bit fast. As a lot of work went into the bars of wood. Things went quite well except somehow I had to take out two of the 64 bars :(. So ending up with 62 instead.
Creation of the 'hammers'
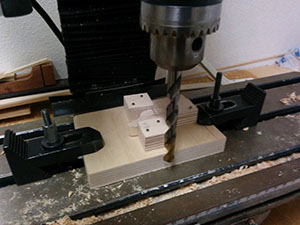
The Gloggomobil works very similar to a piano, as it will use "hammers" to trigger the actual sound. I created the holders for the hammer from a solid piece of wood, which was manually tapered using a draw knife. After quite some sanding the shape was nearly same over the entire length. Then this got cut in 19 parts (for 19 notes). Each holder got a hole for the stick that will become the actual "hammer".
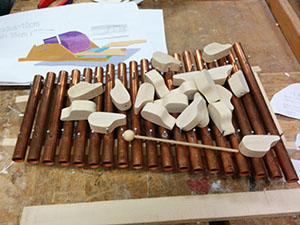
Note that the sticks and balls for the tip of the hammer where purchased; as it would be too much work to try to make these from scratch. Both have been purchased at AliExpress, but you might find similar materials in a local DIY / hobby shop. The sticks are actually ice-cream sticks (very hard compared to the wood I could find in DIY stores).
Make sure that the ball of the hammer has enough space and will not get stuck to neighbouring notes or hit a neighbouring pipe!
To drill the center hole for the hammers (the hole that will be used as the axis), another helper piece was made; this to make sure that drilling would have practically no offset.
Between the hammers tiny copper washer rings were placed (AliExpress). Otherwise the hammers can move around too much. And some space need to be kept between the notes!
Building the second pulley
There is not much to say about the design of the second (small) pulley. The tricky part was to determine the size (diameter) of this pulley. Too big, and the music would go to fast - too small, and you keep spinning forever to make a full circle on the big wheel. In the end it turned out to be quite okay with a radius of XX cm, making the ratio 1:xx

The handle for the small pulley (and the part that makes you control the machine!) was just done on the lathe without any plan.

Glueing the drive belt
A Polyeruthane round drive belt was used. To put this together a knife was heated above a tea-light. The knife will become very hot, which allows you to put the open ends of the drive belt on both sides and "sliding" off the knife and pressing firmly: Such that the sides will get glues to each other. It took a bit of trial-and-error to get this done properly.
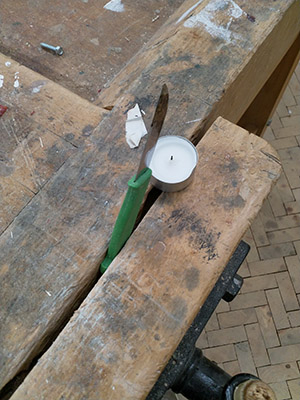
The actual length of the drive belt depends on the size of the two pulleys (big wheel and the small one).
Wrapping things up
Finally, putting all the parts together we get a working Gloggomobil!